Content

Answers

There are a number of factors to account for when using images in hero unit sections of your website. Push10 has an excellent primer, and here is a helpful excerpt:

By default, the ideal website hero image size for full-screen background images is 1,200 pixels wide. However, if users are browsing on larger screens, these images need to scale up to fill the screen. This can often introduce some blur into the image. If the image is just a background image, this blur is often acceptable – even desirable. But if the image is a foreground image, or contains vital elements that must be sharp, we will often create larger source images in the range of 1,800 pixels or so. The upside? Sharper images. The downside? Larger files which lead to longer load times.

See also the Images section of the Guide to Local Government Websites for helpful optimization tips.

A frequently asked question, has a searchable common question, clear answer, and FAQ topic label.

  1. Go to the dashboard
  2. Click on the ‘Answers’ icon or the ‘Answers’ label on the left navigation bar
  3. Click on ‘Add New Answers’
  4. Enter the question in the title area
  5. Select the FAQ topic, on the right side, in the ‘FAQ topics’ section
    • The answer post can belong to many topics, click all that apply
  6. Add answer using the content using the visual editor
    • Be detailed with your answers, if there are follow up action items, hyperlink to those pages or forms to keep answers content concise and direct.
    • The visual editor is your standard WYSIWYG editor and the simplest editor for just adding content to a page.
    • A quick detailed guide on how to structure content
  7. Click ‘Publish’ answer content fill out steps

The answers list widget will display a list of questions and answers based on the selected FAQ topic on an existing page.

  1. Navigate to an existing page or create a page
  2. Click ‘Edit page’
  3. Enable page builder by clicking on the ‘Pagebuilder’ tab, if there is no option to click on the tab, the page builder layout is enabled.
    • Note: In order to use the answers list widget, the page builder has to be enabled
  4. Click on the ‘Add widget’ icon tab
  5. Add page title by selecting the ‘Page title’ widget
    • Note: You can scroll through the widgets or type in the widget name on the search bar.
  6. Click on the ‘Add widget’ icon tab
  7. Add the ‘Answers list’ widget
    • answers list widget
  8. Hover over the ‘Answers list’  widget and click edit
    • Add widget title
    • Pick the FAQ topic to display
    • Select display style
    • Insert a number of answers to show in the ‘Number of post to show’ field
      • Enter 0 for ‘Number of posts to show’ in order for all answers that are attributed to the selected FAQ topic to display.
      • Select ‘Sort By’ option
      • Click done
    • answers list steps 1 through 2
    • answer list steps 3 through 6
  9. Click ‘Update’
  10.  Click ‘View Page’ on the top admin bar or  the permalink to view page
    •  Note: To go back into the page admin functionality click on ‘Edit Page’ on the top admin bar.
  11. Finished, your frequently asked questions and answers content will now be listed on the page!

Edit existing parent and child categories

The edits made to the parent and child categories will also update on the ‘Service Center’ app.

  1. Remain in the ‘FAQ Topics’ functionality or navigate to the ‘FAQ Topics’ functionality
  2. Make word choice update
    • Hover over the ‘Parent’ category or ‘Child’ category on the right-hand side where the list of all categories are displayed.
    • Select edit
    • Change the name and slug
    • Click update
  3. Deleting the child category
    • Hover over the child category and a delete option will appear.
    • Select ‘Delete’
    • To confirm the deletion of the child category, click  ‘Ok’ to the notification that will appear.
  4. Deleting the parent category
    • Deleting the parent category will not delete its child categories and will have to be manually done. 
    • Hover over the parent category and a delete option will appear.
    • Select delete
    • To confirm the deletion of the parent  category, click ‘Ok’ to the notification that will appear, 
    • Go to step 3, and delete the child categories that are now floating under no parent category.

Edit existing question and answer

Edits made to questions and answers will also update on the ‘Service Center’ app.

  1. Go to the dashboard
  2. Click on ‘Answers’ on the left navigation bar
  3. On the top right side, there is an empty field to search for your question
    • Type in a keyword to narrow down the list of questions to choose from
    • Click ‘Search Answers’ 
    • search answers content
  4. Hover over the answer and click ‘Edit’
  5. Update question title
    • Type in the new question title and make sure to edit the permalink to match the updated question. 
  6. Edit answer
    • Type in the updated answer in the visual editor
  7. Select the ‘FAQ topics’ change or leave as is
  8. Click ‘Update’
  1. The answers content is divided into 3 columns with the rows populating depending on the total number of parent categories. The titles are organized from left to right.
    • On the ‘FAQ Topics functionality’ on the right side, the list of categories is presented.
    • Skip the categories that have ‘faq’ as part of their title
    • The arrangement is formed in the order the parent titles are listed. For example, the first title will occupy position 1, the parent title that follows the first will occupy position 2, and so on.
    • Position 1 Position 2 Position 3
      Position 4 Position 5 Position 6
    • If the parent category has children categories, make sure they remain under the same parent category when you are switching the order. 
    • Back end view
      parent category
    • Front end view
      front end view of parent categories
  1. Events page elements (front-end)
    1. https://example.proudcity.com/events/ 
    2. Can filter by categories
    3. Event details
      1. Date
      2. Location
      3. Directions
      4. Download to calendar
      5. Share
      6. Upcoming events
  2. Create event categories
    1. Dashboard
    2. Events
    3. Events category
    4. Add new
      1. No parent
      2. Parent
  3. Add event
    1. Title
    2. Content
    3. Where (location)
    4. When
    5. Category
    6. Publish

By creating FAQ topics we are able to distribute where the answers will display throughout the site. If you have already created a FAQ topic please skip to the “Create a question and answer content” or “Display frequently asked questions on a web page” section.

  1. Go to dashboard
  2. Click on ‘Answers’  on the left navigation bar
  3. Click on  ‘FAQ Topics’ on the left navigation bar
  4. Add new FAQ Topics
    • Write a name for the FAQ topics
      • To distinguish the label as a FAQ, add ‘FAQs’ at the end of the name. For example,  Finance FAQs
    • Leave the ‘Parent Category’ dropdown with the default text of ‘None’.
    • Click ‘Click ‘Add New FAQ Topics’
    • faq topic option
  1. Create child category
    • Remain in the ‘FAQ Topics’ functionality or navigate to the ‘FAQ Topics’ functionality
    • If you have filled out the ‘Answers’ worksheet, the child categories are the subheadings to the parent category
    • Write the child title in the ‘Name’ section
    • Click on the ‘Parent FAQ Topic’ dropdown menu 
      • Select the parent category the current child category falls under
      • Leave the ‘Description’ section empty, this section is to be used only when creating parent categories
      • Click ‘Add New FAQ Topics’
    • Notice, the child category created will display with a hyphen in front of its title and be listed below the parent title.
    • Repeat this step to add all child categories that fall under the parent category. 
    • child category selection
  2. Organize the child categories in the same order you want them to display in the ‘Get Answers’ section by dragging the title in the list view and dropping it in the desired placement.
    • Make sure they remain under the same parent category when you are switching the order.
    • Back end view
      parent category
    • Front end view
      front end view of parent categories
  1. Go to the dashboard
  2. Click on ‘Answers’  on the left navigation bar
  3. Click on  ‘FAQ Topics’ on the left navigation bar
  4. Create a parent category 
    • If you have filled out the ‘Answers’ worksheet, all the H3 headings will be ‘Parent categories’ 
    • Write the parent title  in the ‘Name’ section
    • Set up the icon for your parent category
      • Look for icons in the fontawesome website, usually, the icons that are bold are free.
      • Select icon
      • Copy the code that is provided
        • <i class=”fas fa-ad”></i>
      • Paste it in the ‘Description’ section
      • Leave only what is inside the quotes, for this example, only fas fa-ad would be left as the final description. 
    • Click  ‘Add New FAQ Topics’
    • Repeat this step to add all parent categories
    • faw parent category
  5. Once all are inserted, arrange them in the order they should display in the ‘Get Answers’ tab of the Service center. This step should be done before creating child categories.
    • The answers content is divided into 3 columns with the rows populating depending on the total number of parent categories. The titles are organized from left to right.
    • On the ‘FAQ Topics functionality’ on the right side, the list of categories is presented.
    • Skip the categories that have ‘faq’ as part of their title
    • The arrangement is formed in the order the parent titles are listed. For example, the first title will occupy position 1, the parent title that follows the first will occupy position 2, and so on.
    • Position 1 Position 2 Position 3
      Position 4 Position 5 Position 6

The service center widget will bring together all previous steps with a visual representation of the icon, parent and child category titles, question, and answer. 

  1. Go to the dashboard
  2. Click on ‘Pages’ on the left navigation bar or the “Pages’ icon
  3. Navigate to an existing page
  4. Click ‘Edit page’
  5. Enable page builder by clicking on the ‘Pagebuilder’ tab, if there is no option to click on the tab, the page builder layout is enabled. 
    • Note: In order to use the service center widget, the page builder must be enabled
  6. Click on the ‘Add widget’ icon tab 
  7. Add page title by selecting the ‘Page title’ widget
    • Note: You can scroll through the widgets or type in the widget name on the search bar.
  8. Click on the ‘Add widget’ icon tab 
  9. Add the ‘Service Center’ widget
    • service center widget
  10. Hover over the ‘Service Center’ Widget
  11. Click ‘Edit’
  12. Select the tabs to display
  13. Checkmark the parent category you would like to be displayed.
    • service center options
  14. Click ‘Done’
  15. Click ‘Update’
  16. Click ‘View Page’ on the top admin bar or the permalink to view the page. Note: To go back into the admin functionality click on ‘Edit Page’ on the top admin bar.

First, you would have had to create contact groups and new contacts. If you do not recall these steps, follow the ‘How to create contacts in your ProudCity powered government website‘ guide.

The contact list widget will display a list of staff members based on the selected group on an existing page.

  1. Navigate to an existing page
    • Note: You should know you are on a page when the admin bar on top states ‘Edit page’
  2. Click ‘Edit page’
  3. Enable page builder by clicking on the ‘Pagebuilder’ tab, if there is no option to click on the tab, the page builder layout is enabled.
    • Note: In order to use the contacts list widget, the page builder has to be enabled
    • click page builder
  4. Click on the ‘Add widget’ icon tab
    • add_widget
  5. Add page title by selecting the ‘Page title’ widget
    • Note: You can scroll through the widgets or type in the widget name on the search bar.
  6. Click on the ‘Add widget’ icon tab
  7. Add the ‘Contact list’ widget
    • contact list widget
  8. Hover over the ‘Contact list’  widget and click edit
    • Add widget title
    • Pick the category(ies) to display
    • Select display style
      • Contact lists are commonly displayed in the ‘Table View’ style but you can always go back and change the style that best matches your ProudCity site.
    • Insert a number of posts to show in the ‘Number of post to show’ field
      • Enter 0 for ‘Number of posts to show’ in order for all staff members that are attributed to the selected category to display.
      • Select ‘Sort By’ option
      • Select ‘Hide Columns’ option
        • If your contact list widget is being used on a department page, it is recommended to hide ‘Department’ and ‘Social’.  This eliminates redundant information and allows for a cleaner look.
        • Hide certain columns if they do not pertain to the list you’re creating.
      • Click done
    • contact list option 1
    • contact list option2
  9. Click ‘Update’
  10.  Click ‘View Page’ on the top admin bar or  the permalink to view page
    •  Note: To go back into the page admin functionality click on ‘Edit Page’ on the top admin bar.

By creating a new contact that has staff member name, position, label, and form of communication either email or/and phone. We use labels to distribute where the contacts display throughout the site.

  1. Got to the dashboard
  2. Click on the ‘Contacts’ icon or the ‘Contacts’ label on the left navigation bar
  3.  Click on ‘Add New’
  4. Add new staff member
    • Type in staff name
  5. In the ‘Staff Member Info’
    • Position
    • Email
    • Phone
    • Optional fields – Facebook URL, Twitter Username
    • Try to be consistent with the information you fill in for each staff member.
  6. Add staff member bio in the visual editor, this is optional
  7. Add Staff photo, the photo will display similar to the feature image style
    • Headshot photos should be portrait orientation.
    • The tool is going to crop and resize images for responsive design, so before uploading the headshots,  crop out areas with lots of space around the face area such as background or even chest and torso.
    • Pick from the media library
    • Click ‘Set Staff Photo’
  8. Pick Group(s)
    • The staff member can belong to multiple groups, select all that apply. For example, if someone should be displayed in ‘City Staff’ AND ‘Administration Staff’ you should select both groups. This would also be the case if someone should be displayed in the elected ‘Elected Official’ or  ‘Council’ group.
    • add contact steps screen shot


By creating group categories we are able to distribute where the contacts display throughout the site. This is commonly used for lists for specific departments such as ‘Administration Staff’ to list the employees that make up that department. If you have already created a group category please skip to the “Create a contact” or “Display a list of contacts on a web page” section.

  1. Go to dashboard
  2. Click on ‘Contacts’  on the left navigation bar
  3. Click on  ‘Groups’ on the left navigation bar
  4. Add new contact  group
    • Write a name for the group
    • Leave the ‘Parent Category’ dropdown with the default text of ‘None’.
    • Click ‘Click ‘Add New Group’
    • add group to contacts
  1. Go to the dashboard
  2. Click on the ‘Events’ on the left navigation bar
  3. Click on ‘Recurring Events’
  4. Click ‘Add Recurring Event’
  5. Select category, on the right side, in the ‘Event Categories’ section
    • The event post can belong to many categories, click all that apply
  6. Add content using the visual editor
    • The visual editor is your standard WYSIWYG editor and the simplest editor for just adding content to a page.
    • A quick detailed guide on how to structure content
  7. Add the recurrences on the ‘Recurrences’ section under the visual editor.
    • recurrences screen shot
  8. Add the event location in the ‘Where’ section, under the ‘Recurrences’ tab.
    • If the event does not have a physical location,  checkmark ‘This event  does not have a physical location’
  9. Add a featured image that will display under the event title and as a thumbnail preview when published
    • Click on the set featured image link on the “Featured image” section located by the bottom right side
    • Select either upload files or media library
    • Select image
    • Add alt text and click on the ‘Set featured image’ button
    • Click ‘Publish’
    • An option to hide the image from the page will  generate after clicking publish
    • If you wish to hide the image within the post, checkmark the option “Don’t display image on individual page” afterward click publish to update changes.
    • featured image click
  10. You created a recurring event! If a change needs to be made that applies to all event within the thread of recurring events, you can make the update by
    • Clicking on the ‘Recurring Events’ option on the left navigation bar
    • Selecting the event that needs to be modified and updating
      • If there are modifications to event dates all recurrences of this event will be deleted and recreated, previous bookings will be deleted.
    • If it is only one event that needs to update,
      • Click on ‘Events’
      • Select the individual recurring event and make the update

Displays news post on a web page

The news list widget will display a list of news posts based on the selected categories on an existing page.

  1. Navigate to an existing page
    • Note: You should know you are on a page when the admin bar on top states ‘Edit page’
  2. Click ‘Edit page’
  3. Enable page builder by clicking on the ‘Page Builder’ tab , if there is no option to click on the tab, the page builder layout is enabled.
    • Note: In order to use the news list widget, page builder has to be enabled
    • click page builder
  4. Click on the ‘Add widget’ icon tab
    • add_widget
  5. Add page title by selecting the ‘Page title’ widget
    • Note: You can scroll through the widgets or type in the widget name on the search bar.
    • page title widget
  6. Click on the ‘Add widget’ icon tab
  7. Add the ‘News Posts list’ widget
  8. Hover over the ‘News Post list’  widget and click edit
    • Add widget title
    • Pick the category(ies) to display
      • If you select the parent category, it will also display all its corresponding  sub categories
    • Select display style
      • News posts are commonly  displayed in the ‘List View’ style but you can always go back and change the style that best matches your ProudCity site.
    • Insert a number of post to show in the ‘Number of post to show’ field
      • Enter 0 for all news posts to show  under the selected category type  or select specific amount to list.
    • Select sort order, either ‘Ascending’ or ‘Descending’
    • Click done
    • steps for news list widget
  9. Click ‘Update’
  10.  Click ‘View Page’ on the top admin bar or  the permalink to view page
    •  Note: To go back into the page admin functionality click on ‘Edit Page’ on the top admin bar.
  11. Finished, your news posts will now be listed on the page!

Create news category

By creating news categories we are able to display a listing of specific news posts on a web page.

  1. Go to the dashboard
  2. Click on the ‘News’ label on the left navigation bar
  3. Click on ‘Categories’ on the left navigation bar,
  4. Add new Category
    • Write a name for the news category
    • Leave the ‘Parent Category’ drop down with the default text of ‘None’.
    • Click ‘Add New Category’
    •  This new category will now be an option in the Parent Category drop down menu.
    • If you want to add a subcategory
      • Write a name for the category
      • Select the Parent Category by clicking on the ‘Parent Category’ drop down menu.
      • Click ‘Add New Category’
      • Subcategories are indented
    • adding news categories screen shot


  1. Go to the dashboard
  2. Click on the ‘‘Documents’ label on the left navigation bar
  3. On the left navigation bar, click on ‘Document Types’
  4. Add document type
    • Write a name for the document type
    • Leave the ‘Parent Category’ drop down with the default text of ‘None’.
    • Click ‘Add New Document Type’
    •  This new document type will now be an option in the Parent Category drop down menu.
    • If you want to add a subcategory
      • Write a name for the document type
      • Select the Parent Category by clicking on the ‘Parent Category’ drop down menu.
      • Click ‘Add New Document Type’
      • Subcategories are indented
    • Click ‘Add New Document Type’
    • add document type
  1. Hover over the ‘Hero unit (page header)’ widget and click edit.
    • image of red pointer clicking edit
  2. Header is recommended  if you have a good landscape orientation image for the department 
    • Select the ‘Header’ radio button
    • Leave the ‘Text’ field as <h1>How do I add a background image to the page header?<h1/>
    • For container background, select the ‘Image’ radio button 
    • For image, select the ‘Yes’ radio button
    • Select an option for the ‘Image Vertical Alignment’ ( you can always go back and modify)
    • Click done
    • To add image, click on the ‘Set featured image’ link in the “Featured image” section located at the bottom right side  
    • Select either upload files or media library
    • Select image
    • Add  alt text 
    • Click on the ‘Set featured image’ button
    • screen shot of the choices to make for hero unit

Write and format your answers

We have created a content style guide to help enforce consistency and uniformity in how information is presented throughout your ProudCity site.

  1. Once you have collected the answers, we recommend tailoring the language with the tips provided in the content style guide.
  2. As you finalize the questions and answers from the departments, we recommend you start placing them under their designated child category. If you see that your question does not belong to a specific child or parent category, create a new one. This will allow you to continue building the structure without having floating questions and answers.
  3. Presented is an example of how we use the structure to create and format the answers and questions content.  In the worksheet, you are provided with multiple parent and child categories to help you get started.

Culture & recreation ——————–> Parent category

Park permits and reservations      ————————-> Child category

      • Is there a public swimming pool? ——————-> Question
        • Detailed answer ——————————–> Answer
      • Who do I call to reserve a park facility? ———–> Question
        • Detailed answer ——————————-> Answer

Parks and recreation  ————————————–> Child category

      • How do I enroll my child in little league? ———-> Question
        • Detailed answer——————————–> Answer

Events ———————————————————> Child category

      • Where can I find a list of upcoming concerts and cultural events? ————> Question
        • Detailed answer——————————-> Answer
  • As we can see from this structure, there is only one parent with multiple children, where each child category has at least one question and answer.  
  • Provided is a visual representation of how the parent, child, question, and answer will look when you follow the structure designed.
Parent categories
parent categories screen shot
Child categories
child categories screenshot
Question
Question screenshot
Answer
Answers screenshot

Upload

Whether you’re using the featured image or the add media feature you upload your files to ProudCity just like you would attach a file to an email.


Once you have selected and uploaded a file, make sure to fill in the file details: title, caption, alt text and description. This will help with SEO and in the future when searching the media library to reuse the file.


Media library

Once files have been uploaded to ProudCity they live in media library for future use so you do not need to upload a new file every time you would like to use media in your content.  If you are diligent with you file descriptions as mentioned above, the search feature will be even more helpful as your media library goes.

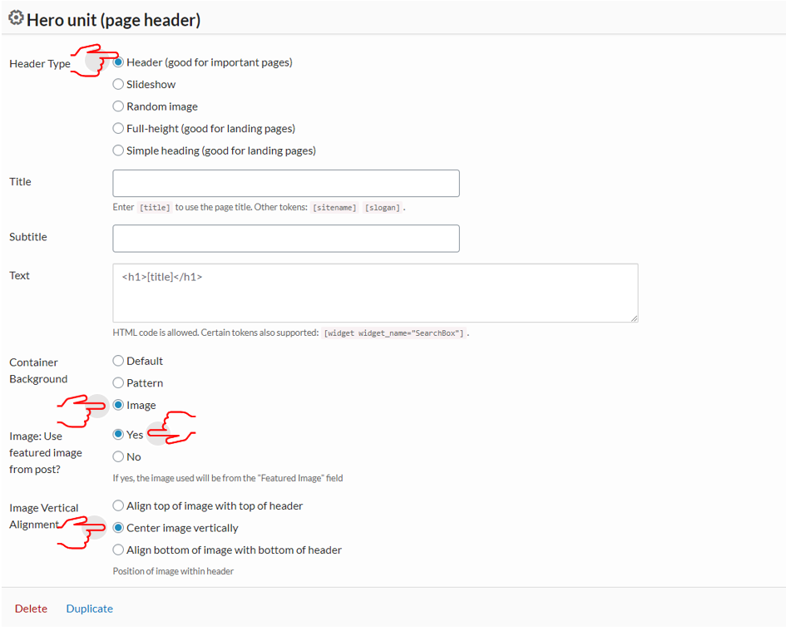
Editing image in the dashboard

Once media is inserted into your content you can double click the image to get some quick edit options to format your text around your image.

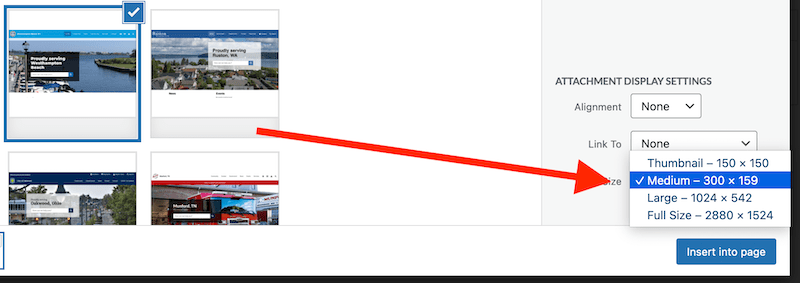
If you click on the pencil icon you will get even more options for editing your media, including editing the size of the image. We recommend that you use the present thumbnail, small, medium, large and full size settings for consistency. If you need even more advanced editing capabilities, you can select “edit original” to rotate, crop and customize dimensions.

Tips

Credit and licensing

There is a lot of free media out there, make sure that you are getting permission and licensing if you’re using media that you did not create or pay for.

Creative Commons (CC) is the most common media license to encounter on the web, and essentially breaks down into 3 concerns (the actual licenses are more nuanced, but the gist is):

  1. Use my stuff, just cite me!
  2. Use my stuff, just not for commercial uses and cite me!
  3. Use my stuff, but you can’t change it and cite me!

(you can learn more about the licenses here: https://creativecommons.org/licenses/ )

When getting an image off Flickr, Wikipedia, or google image search (try the advanced options), you will likely see the CC license along with the content, so just make note of the source.

To attribute an image using CC, simply edit the image’s caption with a brief message:

“CC Image courtesy of Librarian by Day on Flickr”

The maxim to follow with licenses generally is some attribution is better than no attribution!

Featured images are pre-formatted into some of our content types and templates such as news posts and departments. Oftentimes the feature post is highlighted in the header of content and previewed as a thumbnail on another page or list.

The add media option provides the admin with more flexibility to post media throughout their content. Simply put your cursor where you want the media to inserted and select add media to start the process.

Media input with the “Add Media” method will not show up in teasers lists, however.   To have an image display in the teaser view and to take more direct control over the appearance of a post, simply check the “Hide Featured Image” checkbox on the edit page after selecting a featured image.

There are some instances where a “portrait” (taller than wide) or “landscape” (wider than tall)  style image may look awkward or not fit nicely into your content.  If you are starting from a very large image, it could be possible to crop (see below) the image to the appropriate aspect ratio.  Often it is just easier to select a new image.

Images will generally be automatically re-sized (like when using the Page Header widget), but you can also select specific sizes when inserting an image into a post.

Screenshot of image size options

No minimum file size but some displays of images will not look great if you’ve started with a smaller image.  For instance, the “Page Header” widget in “Header” or “Full Header” mode really needs an image at least 1100px wide to not become visually distorted.

ProudCity recommends that video and audio be posted through a free online account like YouTube.  These services automatically make video streamable to mobile devices, and will easily reach the broadest audience.  YouTube has the additional benefit of being consumable by the home page Social Wall.

Not especially.  The standard file types listed above all have some level of “compression” and will be fine for web-based publishing.  There are certain, more rare, image formats like .tiff and .raw that are “un-compressed,” will likely be too large for easy viewing on the web, and should be avoided.

The most common image file types are: .jpg, .png, .gif.

You can add a news post list to most pages on ProudCity following these steps:

  1. Edit page
  2. Enable Pagebuilder
  3. Add widget
  4. Select news post list widget
  5. Edit news post list widget
  6. Check desired category
  7. Set desired number of posts to list
  8. Set order
  9. Select done
  10. View page

You can add a news post by following the below steps:

    1. Go to the dashboard
    2. Click on the ‘News’ icon or the ‘News’ label on the left navigation bar
    3. Click ‘Add new’
    4. Add news  title
    5. Select category, on the right side, in the ‘Categories’ section
      • The news post can belong to many categories, click all that apply
    6. Add content using the visual editor
      • The visual editor is your standard WYSIWYG editor and the simplest editor for just adding content to a page.
      • A quick detailed guide on how to structure content
    7. Add a featured image that will display under the news title and as a thumbnail preview when published
      • Click on the set featured image link on the “Featured image” section located at the bottom right side
      • featured image click
      • Select either upload files or media library
      • Select image
      • Add alt text and click on the ‘Set featured image’ button
      • Click ‘Publish’
      • An option to hide the image from the page will  generate after clicking publish
      • If you wish to hide the image within the post, checkmark the option “Don’t display image on individual page” afterward click publish to update changes.
      • featured image pic
    8. Add meta description and keyphrase by scrolling down and clicking on the ‘Yoast SEO’ tab
      • Add focus keyphrase in the empty field titled ‘Focus keywords’ underneath the SEO, Readability, Social tabs.
      • Include the keywords the page is targeting.
      • Click edit snippet to add meta description.
      • Write Meta description in the empty field under ‘Meta description’.
      • Close snippet editor
    9. Click ‘Publish’
    10.  Click “View Post” on the top admin bar or the permalink to view the news post. Note: To go back into the news admin functionality click on ‘Edit Post’ on the top admin bar.
    11. You created a news post! All news posts can be found on the ‘News’ page of your ProudCity site.

Yes, beginning with the 1.39.0 Release on September 21, 2017, ProudCity has a 25MB soft file size limit. If you need to upload larger files, please submit a ticket and we assist in large file uploads.

Please note that the following features will not be available for files over 20MB:

  1. From the dashboard select events
  2. View list of recurring events
  3. Editing recurring event
    1. Edit from recurring event list to change the entire string of events
    2. Make update
    3. Publish
  4. Editing a specific event within a string of a recurring event
    1. Dashboard
    2. Events
    3. Find the specific event that you want to edit
    4. Select edit
    5. Update
  1. Go to the dashboard
  2. Click on the ‘Events’ label on the left navigation bar
  3. Click on ‘Event Categories’ on the left navigation bar,
  4. Add new event category
    • Write a name for the event category
    • Leave the ‘Parent Category’ dropdown with the default text of ‘None’.
    • Click ‘Add New Event  Category’
    • event category screen shot
  1. Navigate to an existing page
    • Note: You should know you are on a page when the admin bar on top states ‘Edit page’
  2. Click ‘Edit page’
  3. Enable page builder by clicking on the ‘Pagebuilder’ tab, if there is no option to click on the tab, the page builder layout is enabled.
    • Note: In order to use the events list widget, the page builder has to be enabled
    • click page builder
  4. Click on the ‘Add widget’ icon tab
  5. Add page title by selecting the ‘Page title’ widget
    • Note: You can scroll through the widgets or type in the widget name on the search bar.
  6. Click on the ‘Add widget’ icon tab
  7. Add the ‘Events List’ widget
    • event list screen shot
  8. Hover over the ‘Events Post list’  widget and click edit
    • Add widget title
    • Pick the category(ies) to display
    • Select display style
      • events posts are commonly displayed in the ‘List View’ style but you can always go back and change the style that best matches your ProudCity site.
    • Insert a number of posts to show in the ‘Number of post to show’ field
      • Enter 0 for all events posts to show under the selected category type or select a specific amount to list.
    • Check or unchecked
      • Featured
      • Pager
      • More
    • Click done
    • steps for events screen shot
  9. Click ‘Update’
  10.  Click ‘View Page’ on the top admin bar or  the permalink to view page
    •  Note: To go back into the page admin functionality click on ‘Edit Page’ on the top admin bar.
  11. Finished, your events will now be listed on the page!

Because government serves a wide constituency, structured content in web pages is critically important in addressing the needs of all website visitors. It is particularly important for presenting truly accessible web content.

While ProudCity addresses many content structure issues “behind the scenes,” whether you’re using the our visual or text editors, it’s important to understand the basics and best practices of structured content as you design your web pages.

Learn more.

Information architecture is the critical first step to ensuring your digital government content is findable and usable by those seeking the desired information. Learn more »

Close window