Overview
Launching your ProudCity powered government website involves a transfer of information between ProudCity and your current host provider. In order for your website to go LIVE, you need to know your current domain host provider and login information.
Steps
Prepare for your launch
Up to a week (and at least 24 hours), before you plan to launch, you should:
- Create redirects
- Configure page metadata
- Create a LAUNCHING ticket with ProudCity support
Create a LAUNCHING ticket with ProudCity support
After creating a launching ticket, please follow either the “Launch with turnkey onboarding service” or “Launch with your tech manager” section of the guide.
- At least 24 hours before you launch, create a support ticket with the title, “LAUNCHING: <your website name>”. This will provide one place for us to make all launch-related communication and will instruct our engineering team to prepare your production environment.
- Checklist items:
- In this ticket include
- Your TEST website URL.
- Your website’s URL(s), including any additional domains that should be redirected. Please specify your primary URL (whether it should be www.mysite.com or mysite.com).
- Your launch timing: When will the DNS changes be made.
- If you are a Turnkey Onboarding customer and would like us to configure your DNS, gather your domain control panel username and password and we will collect the information during a weekly meeting.
Launch with turnkey onboarding service
- We can configure your DNS for you if you provide your domain control panel username and password.
- If you feel uncomfortable sharing the current password, feel free to change it to a temporary password.
- If you prefer your tech manager handling the DNS setting you can skip to the “Launch with your tech manager”
- Update LAUNCHING ticket
- Respond to your LAUNCHING ticket verifying that the DNS changes have been made. We will monitor your DNS propagation. Typically this only takes an hour or so, but depending on the host and TTL (Time to Live) settings, it may take longer. Once your DNS has propagated, we will install your Let’s Encrypt SSL certificate and respond to your ticket verifying that your website is LIVE!
- Note: If your DNS propagates before our engineering team installs the SSL certificate, visitors to mysite.com will be temporarily redirected to your mysite.proudcity.com subdomain.
- After the launch, we will submit your website to Google Webmaster Tools and Bing for you.
Launch with your tech manager
Launch steps:
- Edit DNS settings
- Once you have submitted your LAUNCHING support ticket and have verification that our engineering team has prepared your production environment, you are ready to change your DNS information.
- Log in to your domain control panel, and click on configure your DNS settings. The location of these settings varies by the domain registrar. Here are steps for some common registrars:
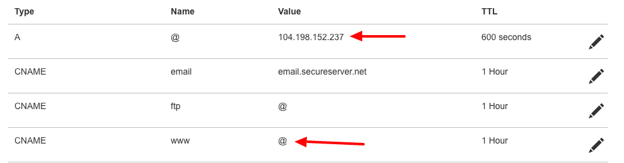
- You will need to create or edit the A records for both mydomain.com (“@”) and www.mydomain.com (“www”). The IP address to use for the A records is 104.198.152.237. Note: If your registrar has a CNAME record pointing to “@”, this is acceptable as well.
- Example configuration in GoDaddy:
- Update LAUNCHING ticket
- Respond to your LAUNCHING ticket verifying that the DNS changes have been made. We will monitor your DNS propagation. Typically this only takes an hour or so, but depending on the host and TTL (Time to Live) settings, it may take longer. Once your DNS has propagated, we will install your Let’s Encrypt SSL certificate and respond to your ticket verifying that your website is LIVE!
- Note: If your DNS propagates before our engineering team installs the SSL certificate, visitors to mysite.com will be temporarily redirected to your mysite.proudcity.com subdomain.
- After you launch, you should tell Google (and Bing!) about your new website.
- Go to Google Webmaster tools: https://www.google.com/webmasters/tools/home (and login with your Gmail account, if necessary)
- Click Add Property
- Use the TXT DNS record verification method. Select your registrar (if it is not pre-selected) and follow the steps.
- In the left sidebar, click Crawl > Fetch as Google
- Leave the URL box blank, select Desktop and click Fetch and Render
- Leave the URL box blank, select Mobile: Smartphone and click Fetch and Render
- Wait for each fetch to complete. For each entry, click the Submit to Index button
- In the popup select, Crawl this URL and its direct links, enter the CAPTCHA and click Go
- Submit to Bing: Go to http://www.bing.com/toolbox/submit-site-url, and follow the steps. More help documentation.
Do’s and don’ts
Do
- Gather domain hosting login information and confirm you can log in.
- Coordinate date and time with ProudCity.
Don’t
- Wait until launch week to find your login credentials for where your domain name is hosted.
- Forget to submit a LAUNCHING support ticket.
Resources
- Common registrars:
- Create a support ticket
- Meta description guide
- How to create redirects with your ProudCity powered government website
- How to set up Cloudflare for your ProudCity powered government website
ProudCity is a digital government platform that makes it easy and cost-effective to launch and manage all aspects of digital government operations, including websites, meetings, online forms and payments.
Subscribe to our newsletter or connect with us on Twitter, LinkedIn and elsewhere.