Overview
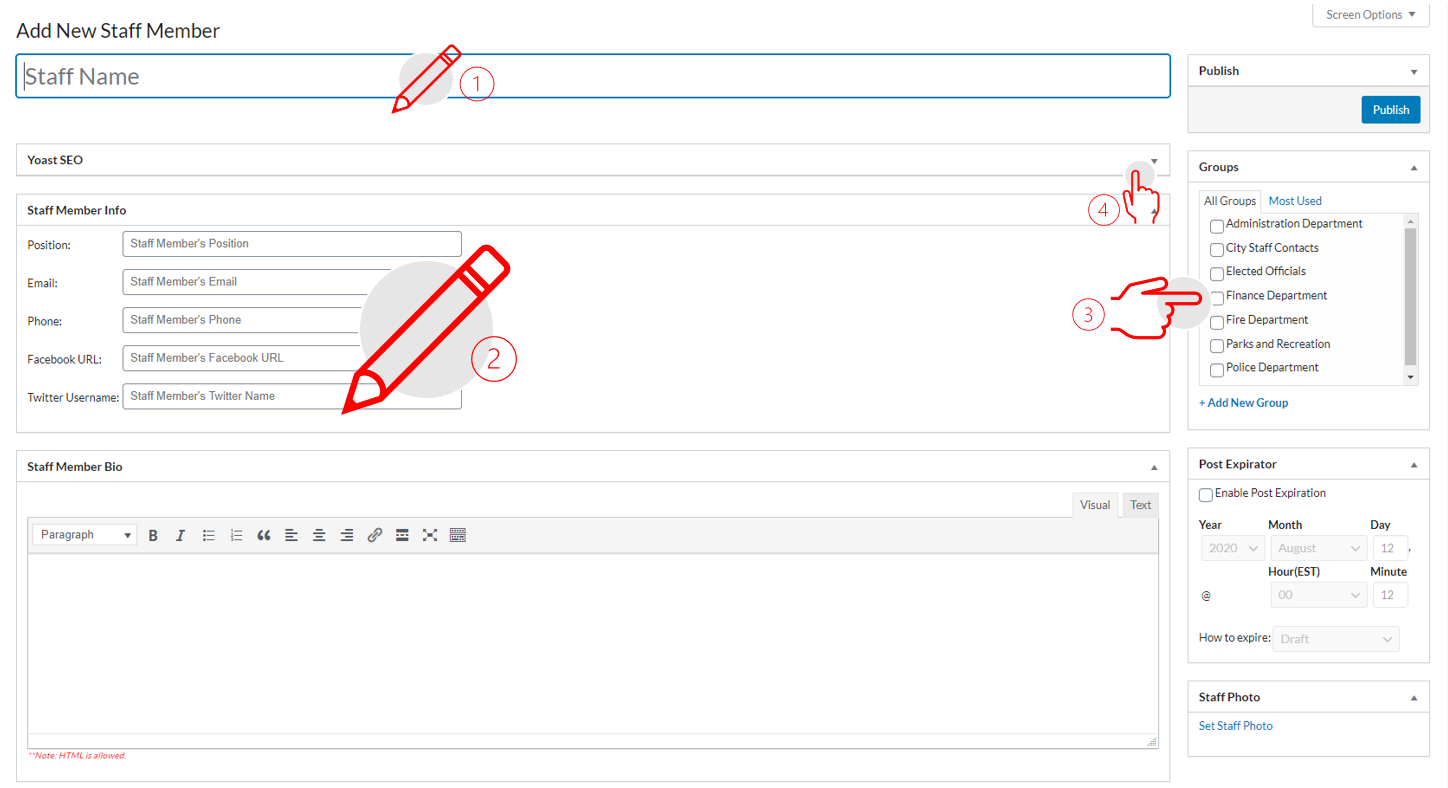
A contact has staff member name, position, label, and form of communication either email or/and phone. Optional fields available include Facebook URL, twitter username, staff member bio, and photo. We use labels to distribute where the contacts display throughout the site.
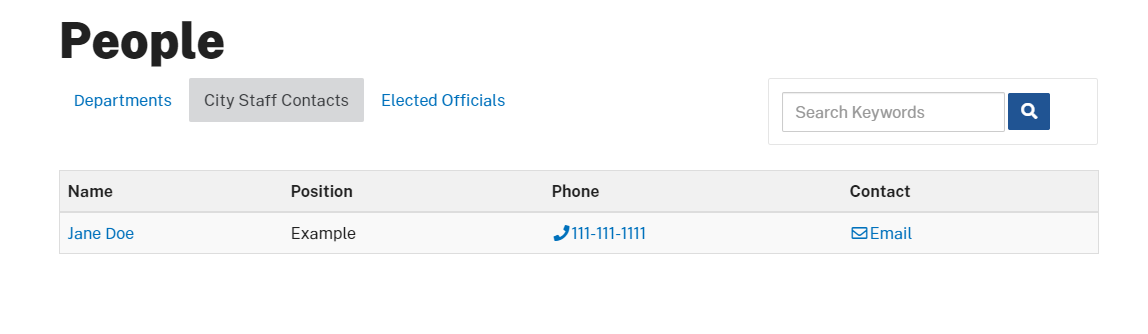
Example
In our ProudCity demo site, we demonstrate how the staff contact directory will show after creating contacts and attributing them to a group category. The contacts automatically populate in the directory. Staff contact information can be displayed as a list on a specific page. Linked is an example of staff contact information displayed as a table view for council members, in some other cases this could be department staff.
Video
Steps
Create groups
By creating group categories we are able to distribute where the contacts display throughout the site. This is commonly used for lists for specific departments such as ‘Administration Staff’ to list the employees that make up that department. If you have already created a group category please skip to the “Create a contact” or “Display a list of contacts on a web page” section.
- Go to dashboard
- Click on ‘Contacts’ on the left navigation bar
- Click on ‘Groups’ on the left navigation bar
- Add new contact group
- Write a name for the group
- Leave the ‘Parent Category’ dropdown with the default text of ‘None’.
- Click ‘Click ‘Add New Group’

Create a contact
A contact has staff member name, position, label, and form of communication either email or/and phone.
- Got to the dashboard
- Click on the ‘Contacts’ icon or the ‘Contacts’ label on the left navigation bar
- Click on ‘Add New’
- Add new staff member
- Type in staff name
- In the ‘Staff Member Info’
- Position
- Phone
- Optional fields – Facebook URL, Twitter Username
- Try to be consistent with the information you fill in for each staff member.
- Add staff member bio in the visual editor, this is optional
- Add Staff photo, the photo will display similar to the feature image style
- Headshot photos should be portrait orientation.
- The tool is going to crop and resize images for responsive design, so before uploading the headshots, crop out areas with lots of space around the face area such as background or even chest and torso.
- Pick from the media library
- Click ‘Set Staff Photo’
- Pick Group(s)
- The staff member can belong to multiple groups, select all that apply. For example, if someone should be displayed in ‘City Staff’ AND ‘Administration Staff’ you should select both groups. This would also be the case if someone should be displayed in the elected ‘Elected Official’ or ‘Council’ group.
Display a list of contacts on a web page
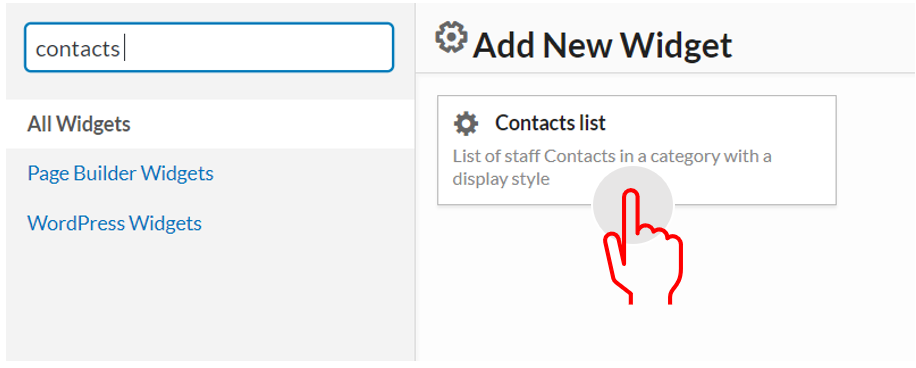
The contact list widget will display a list of staff members based on the selected group on an existing page.
- Navigate to an existing page
- Note: You should know you are on a page when the admin bar on top states ‘Edit page’
- Click ‘Edit page’
- Enable page builder by clicking on the ‘Pagebuilder’ tab, if there is no option to click on the tab, the page builder layout is enabled.
- Note: In order to use the contacts list widget, the page builder has to be enabled

- Click on the ‘Add widget’ icon tab
- Add page title by selecting the ‘Page title’ widget
- Note: You can scroll through the widgets or type in the widget name on the search bar.
- Click on the ‘Add widget’ icon tab
- Add the ‘Contact list’ widget
- Hover over the ‘Contact list’ widget and click edit
- Add widget title
- Pick the category(ies) to display
- Select display style
- Contact lists are commonly displayed in the ‘Table View’ style but you can always go back and change the style that best matches your ProudCity site.
- Insert a number of posts to show in the ‘Number of post to show’ field
- Enter 0 for ‘Number of posts to show’ in order for all staff members that are attributed to the selected category to display.
- Select ‘Sort By’ option
- Select ‘Hide Columns’ option
- If your contact list widget is being used on a department page, it is recommended to hide ‘Department’ and ‘Social’. This eliminates redundant information and allows for a cleaner look.
- Hide certain columns if they do not pertain to the list you’re creating.
- Click done


- Click ‘Update’
- Click ‘View Page’ on the top admin bar or the permalink to view page
- Note: To go back into the page admin functionality click on ‘Edit Page’ on the top admin bar.
- Finished, your staff members’ contact information will now be listed on the page!

Do’s and don’ts
Do
- Remain consistent with the staff information that is provided.
- Remember having a staff member photo is optional.
- Take headshot photos in portrait orientation.
- Crop out areas with lots of space around the face area such as background or even chest and torso.
- Pause and consider which personnel should be listed, many cities will display managers in the directory and then have a larger department staff list within the specific department.
Don’t
- Add staff member photos that are not following a style guide.
- Forget to add page title when enabling the page builder.
- Leave alt text blank when adding images.
- Forget to hide table columns that aren’t relevant and take up valuable space.
Resources
- How to create a page in your ProudCity-powered government website
- A quick guide to government website content structure
- A quick guide to government website images
- How to upload images?
ProudCity is a digital government platform that makes it easy and cost-effective to launch and manage all aspects of digital government operations, including websites, meetings, online forms and payments.
Subscribe to our newsletter or connect with us on Twitter, LinkedIn and elsewhere.