Overview
A department is a content template that structures departments, agencies and divisions into a consistent but flexible section of your site. The template includes a title, content area, contact information, hours, social media link, department sub menu (optional) and icon. Once a department template is created, you can add other types of content such as pages to build out the department menu structure. , which is a separate activity.
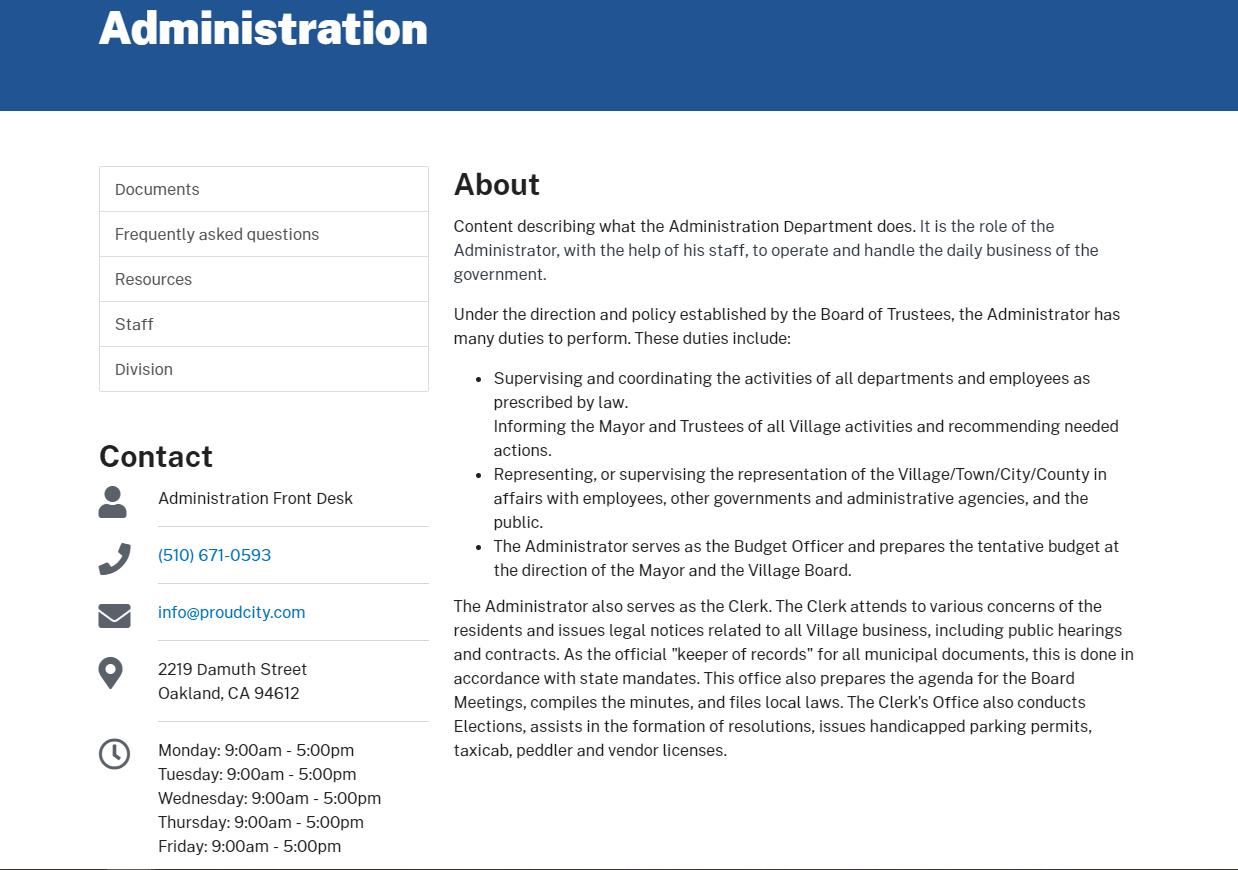
Example
In our ProudCity demo site, we created an Administration Department as an example ‘Department’ template to help you visualize how the template elements will look . Please note that building the menu section of the template is covered in the “How to create a page in your ProudCity powered government website” article.
Video
Steps
- Go to the dashboard
- Click on the ‘Departments’ icon or the ‘Departments’ label on the left navigation bar
- Click ‘Add new’
- Add department title
- Select ‘Single page’, ‘External link’ or ‘Section’
- Single page is for a department that only needs a landing page without a menu structure.
- External link is for departments that should be listed on the department page but linked outside of your website.
- Section is for departments that need a menu structure or sub pages.
- If you select ‘Section’, press ‘Ok’ to the notification that will appear.
- A dropdown will appear with the default name ‘create a new menu’, leave it as is, and click ‘Publish’.
- Select the new menu you created which is the same as the department title.
- Add the icon that best fits the department.
- Skip past the pagebuilder template, down to contact info and fill out relevant fields.
- Usually the contact information provided is the department’s front desk rather than the department head.
- Please take note that the department’s contact information will display dynamically on all department subpages and on the contact directory, which is why listing the department head instead of the front desk can be undesirable in some of the department subpages.
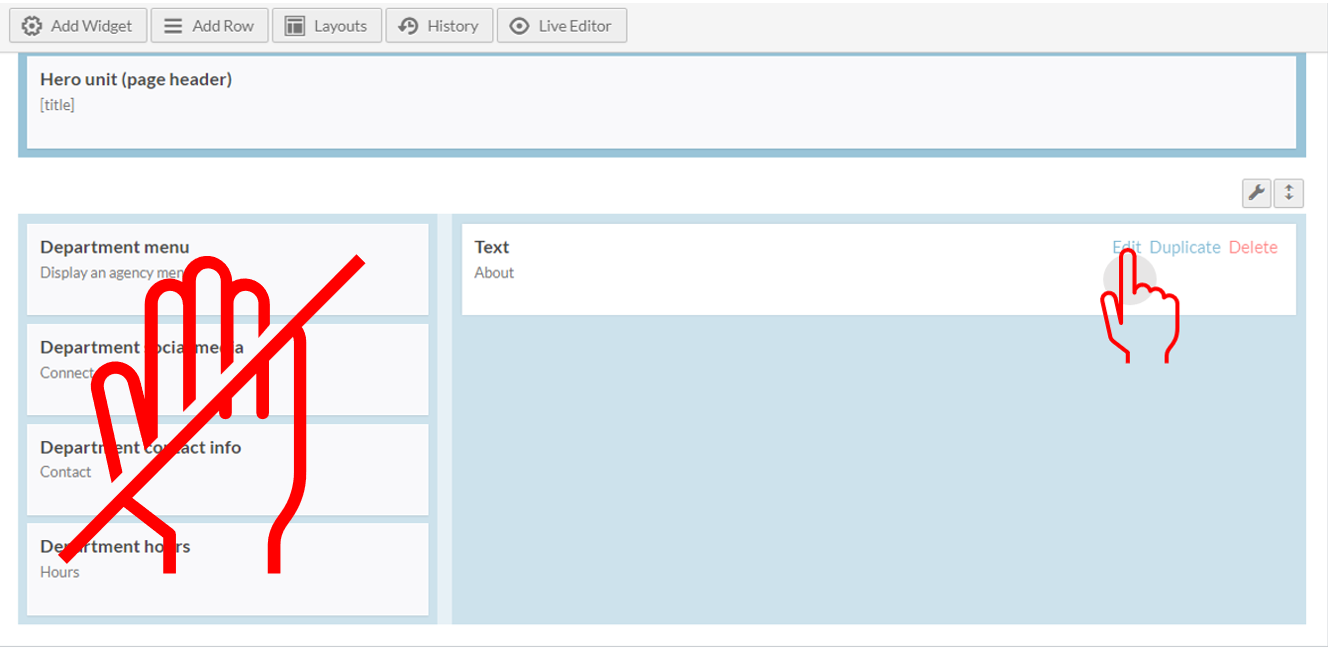
- Edit the text widget in your pagebuilder template.
- Note: Do not edit the left column, those widgets gather information from other sections that is filled dynamically. For example the ‘Department contact info’ is filled with the information provided in step 8, while ‘Department menu’ will generate after creating pages, which is a separate activity.
- Hover over the ‘Text’ widget and click edit.
- Add widget title to create a heading for content, commonly this is “About [department name]”
- The text will serve as the departments’ main page content, don’t forget to use the widget title to create a heading for the section of text.
- By editing the text widget you have access to your familiar visual editor or WYSIWYG editor.
- Add your content using structured content best practices
- Click done
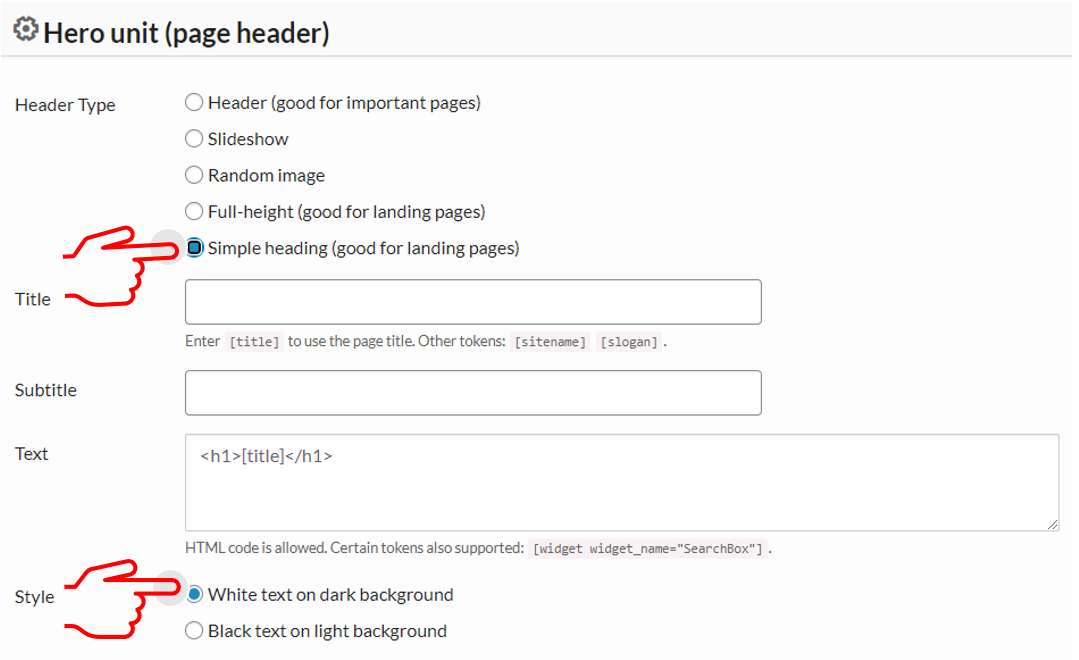
- Hover over the ‘Hero unit (page builder)’ widget and click edit. Choose either the simple heading or header option.

- Simple heading displays a clean design and is good for landing pages
- Select the ‘simple heading’ bullet
- Leave the ‘Text’ field as
- Click ‘Done’
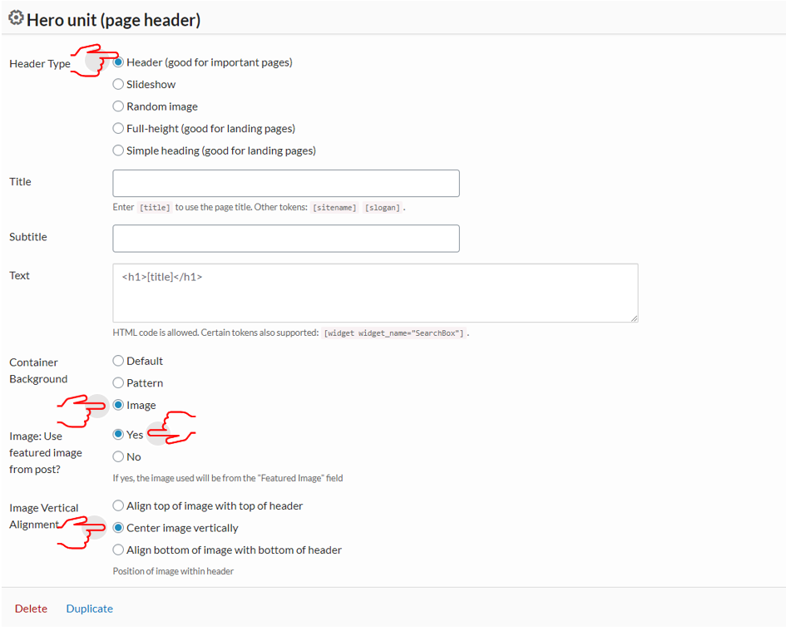
- Header is recommended if you have a good landscape orientation image for the department
- Select the ‘Header’ radio button
- Leave the ‘Text’ field as <h1>[ title ]</h1>
- For container background, select the ‘Image’ radio button
- For image, select the ‘Yes’ radio button
- Select an option for the ‘Image Vertical Alignment’ ( you can always go back and modify)
- Click done
- To add image, click on the ‘Set featured image’ link in the “Featured image” section located at the bottom right side
- Select either upload files or media library
- Select image
- Add alt text
- Click on the ‘Set featured image’ button
- Add meta description and keyphrase by scrolling down and clicking on the ‘Yoast SEO’ tab
- Add focus keyphrase in the empty field titled ‘Focus keywords’ underneath the SEO, Readability,Social tabs.
- Include the keywords the page is targeting.
- Click edit snippet to add meta description.
- Write Meta description in the empty field under ‘Meta description’.
- Close snippet editor
- Click ‘Publish’
- Click “View Department” on the top admin bar or the permalink to view department.
- Note: To go back into the department admin functionality click on ‘Edit Department’ on the top admin bar.
- To start building your menu section, add pages to the department. To add pages, check out the article “How to create a page in your ProudCity powered government website”.
- Done, you created a department!
Do’s and don’ts
Do
- Remember to change ‘create new menu’ to the new menu you created, which will be the department title
- Use the simple heading if you don’t have an appropriate or good department image for the hero unit. The simple heading is a great option and definitely better than a so-so image.
- Be consistent with similarities between departments
- Use landscape images for the hero unit, it will use the full width space. Avoid using portrait images for this space.
Don’t
- Feel obligated to use an image in the hero unit. Images with personnel or department heads often look better in a smaller format in the text area.
- Edit the left column of the page builder, those widgets gather information from other sections that is filled dynamically. For example the ‘Department contact info’ is populated with the information provided in step 8, while ‘Department menu’ will populate after creating pages, which is a separate activity.
- Forget that ‘Departments’ is a separate content type than pages. If you want to edit a sub page of a department, you’ll need to navigate to the page and click ‘Edit page’ on the top admin bar.
- Forget to use the widget title to create a heading for the section of text.
Resources
- How to create a page in your ProudCity powered government website
- A quick guide to government website content structure
- A quick guide to government website images
- Guide on meta descriptions
- How to create the right Meta Description article
- What is meta description?
- How do I upload images or media?
ProudCity is a digital government platform that makes it easy and cost-effective to launch and manage all aspects of digital government operations, including websites, meetings, online forms and payments.
Subscribe to our newsletter or connect with us on Twitter, LinkedIn and elsewhere.